 Products Home
2.1 MP sCMOS Scientific Cameras
- Low <1 e- Read Noise
- Up to 50 Frames per Second for the Full Sensor
- 61% Peak Quantum Efficiency at 600 nm
- High Dynamic Range of up to 87 dB with 23 ke- Full Well
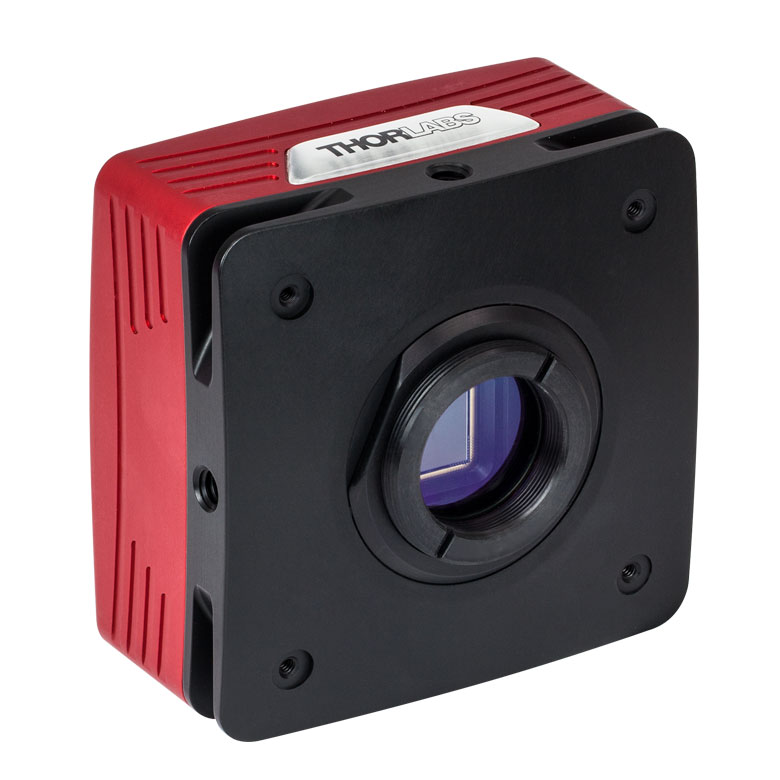
CS2100M-USB
Monochrome sCMOS Camera
Passively Cooled Compact Packaging
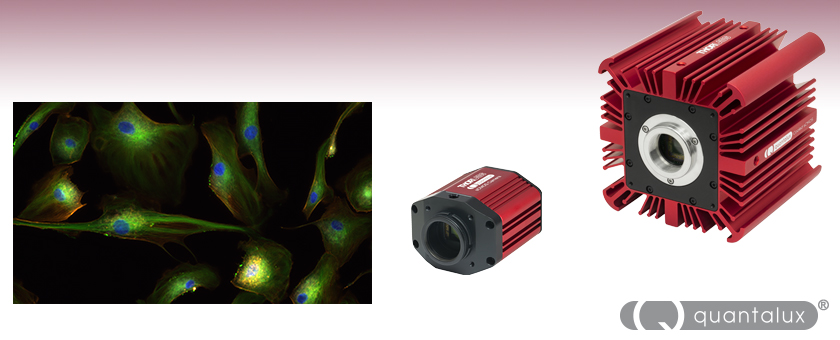
Merged triple emission fluorescence image of FluoCells® prepared BPAE cells taken with a CC215MU camera. Click Here for full-resolution image.
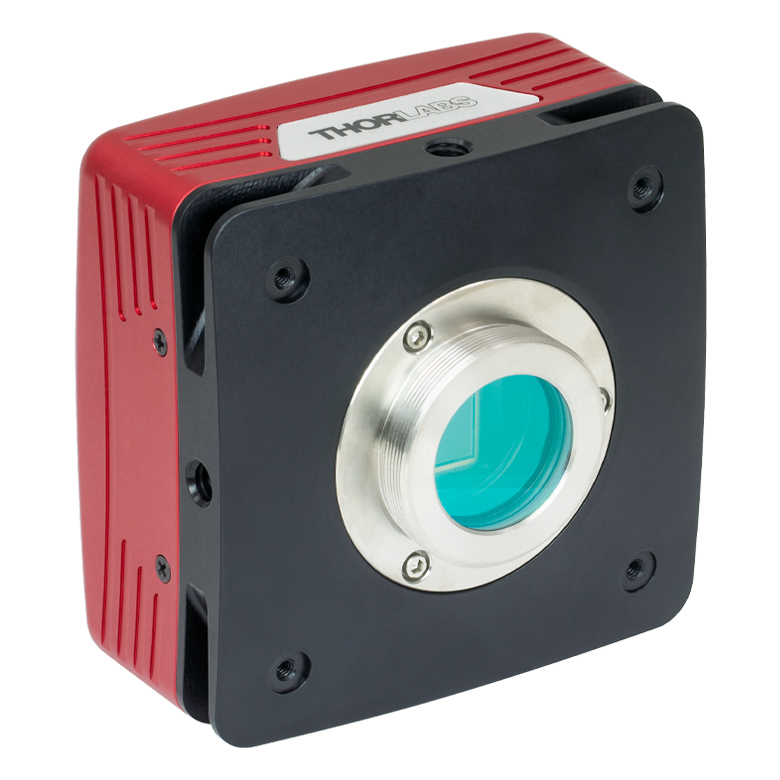
CC215MU
Monochrome sCMOS Camera
Hermetically Sealed TE-Cooled Packaging


Please Wait
| Scientific Camera Selection Guide | |
|---|---|
| Compact Scientific |
Zelux™ (Smallest Profile) |
| Kiralux® CMOS | |
| Kiralux® CMOS Polarization Sensitive | |
| Quantalux® (<1 e- Read Noise) |
|
| Scientific CCD | 1.4 MP CCD |
| 4 MP CCD | |
| 8 MP CCD | |
| VGA Resolution CCD (200 Frames Per Second) |
|
Applications
- Fluorescence Microscopy
- VIS/NIR Imaging
- Quantum Dots
- Autofluorescence
- Materials Inspection
- Multispectral Imaging
 Jason Mills General Manager, Thorlabs Scientific Imaging |
Feedback? |
Features
- 2/3" Format, Monochrome sCMOS 1920 x 1080 Pixel (2.1 Megapixel) Sensor
- High Quantum Efficiency (61% at 600 nm)
- Two Styles Available: Passively Cooled Compact Package or Hermetically Sealed Actively Cooled Package
- Fan-Free Design Reduces Dark Current without Adding Vibration and Image Blur
- <1 e- Median Read Noise
- Triggered and Bulb Exposure Modes
- Rolling Shutter with Equal Exposure Pulse (EEP) Mode for Synchronizing Light Sources
- USB 3.0 Interface
- ThorCam™ Software for Windows® 7 and 10 Operating Systems
- SDK and Programming Interface Support:
- C, C++, C#, Python, and Visual Basic .NET APIs
- LabVIEW, MATLAB, and µManager Third-Party Software
- 1/4"-20 Tapped Holes for Post Mounting
Thorlabs' Quantalux® Scientific CMOS (sCMOS) Cameras offer high sensitivity with high dynamic range, enabling the detection of dim features without overexposing bright details. The combination of extremely low read noise (<1 e- median) and high quantum efficiency peaking at 61% at 600 nm provides excellent performance in even the most demanding low light applications, such as fluorescence microscopy.
Compact Package or Hermetically Sealed TE-Cooled Camera
Our Quantalux sCMOS cameras are offered in two styles: a passively cooled compact package (Item # CS2100M-USB) and a hermetically sealed package with a thermoelectric cooler (TEC) that cools the sensor (Item # CC215MU). Both use a fan-free design to reduce dark current without adding image blur from vibrations. The CC215MU camera's active TE-cooling provides greater dark current reduction when compared to the passively cooled camera; however, the total dark current is also a function of exposure time. For high light levels requiring short exposure times (less than 500 ms), the passively cooled camera is generally sufficient. We strongly recommend a cooled camera for applications with low light levels requiring exposures longer than 500 ms. Please see the Camera Noise tab for more details on the various sources of camera noise and how it impacts the choice between a standard and cooled camera.

Click here to view the full-resolution image.
A FluoCells® mouse kidney fluorescence slide imaged with our CS2100M-USB monochrome Quantalux camera. 16-bit images may be viewed using ThorCam, ImageJ, or other scientific imaging software. They may not be displayed correctly in general-purpose image viewers.
Removable Protective Window
All Quantalux cameras are configured with a clear, broadband, AR-coated protective window to preserve the sCMOS sensor spectral response from 400 - 700 nm. The C-mount adapter and other front end components are removable to provide access to the protective window. If the image spectrum must be limited, for example to eliminate unwanted near-infrared light, we offer a wide range of high-quality interference and colored glass optical filters that can easily be user-installed in both cameras.
Software and Triggering
Each camera features a USB 3.0 interface for compatibility with most computers, and can be controlled with our ThorCam software for use with Windows 7 and 10 operating systems. Developers can leverage our fully featured API and SDK; please see the Software tab for more information.
Our cameras have triggering options that enable custom timing and system control; for more details, please see the Triggering tab. External triggering requires a connection to the auxiliary port of the camera. Accessory cables and boards to "break out" the individual signals are available below. Please note that the USB3-MBA-118 USB 3.0 cable is only suitable for the CS2100M-USB compact camera; the CC215MU cooled camera ships with an appropriate USB 3.0 cable.


| Common Specifications | |
|---|---|
| Sensor Type | Monochrome sCMOS |
| Effective Number of Pixels (Horizontal x Vertical) |
1920 x 1080 |
| Imaging Area (Horizontal x Vertical) |
9.6768 mm x 5.4432 mm |
| Pixel Size | 5.04 µm x 5.04 µm |
| Optical Format | 2/3" (11 mm Diagonal) |
| Max Frame Rate | 50 fps (Full Sensor) |
| Sensor Shutter Type | Rolling |
| Peak Quantum Efficiency | 61% at 600 nm |
| Removable Window AR-Coating Reflectance | Ravg < 0.5% over 400 - 700 nm (Per Surface) |
| Exposure Time | 0.029 ms to 7767.2 ms in ~0.03 ms Increments |
| ADCb Resolution | 16 Bit |
| Vertical and Horizontal Hardware Binning | Continuous Integer Values from 1 to 16 |
| Region of Interest (ROI) | 8 x 2 Pixelsc to 1920 x 1080 Pixels, Rectangular |
| Read Noise | <1 e- Median RMSd / <1.5 e- RMS |
| Digital Output | 16 Bit |
| Dynamic Range | Up to 87 dB |
| Full Well | ≥23 000 e- |
| Lens Mount | C-Mount (1.000"-32) |
| USB Power Consumption (Camera Only) | 3.7 W @ 30 fps (Full Sensor ROI) 4.3 W @ 50 fps (Full Sensor ROI) |
| Operating Temperature | 10 °C to 40 °C (Non-Condensing) |
| Storage Temperature | 0 °C to 55 °C |

| Example Frame Rates at ~1 ms Exposure Timea | Frame Rate | |
|---|---|---|
| LRNb | HFRb | |
| Full Sensor (1920 x 1080) | 30 fps | 50 fps |
| Half Sensor (960 x 540) | 60 fps | 100 fps |
| 1/10 Sensor (192 x 108) | 300 fps | 500 fps |
| Item # | CS2100M-USB | CC215MU |
|---|---|---|
| Max Filter Thickness When Using C-Mount Adapter | 0.050" (1.270 mm) | 0.079" (2.0 mm) |
| Mounting Features | Two 1/4"-20 Holes, One on Top & Bottom Four 4-40 Holes for 30 mm Cage Compatibility SM1 (1.035"-40) Threaded Aperture When C-Mount Adapter is Removed |
Six 1/4"-20 Holes, Two Each on Top & Bottom, One on Each Side Four 4-40 Holes for 60 mm Cage Compatibility |
| Housing Dimmensions | 2.77" x 2.38" x 1.88" (70.4 mm x 60.3 mm x 47.6 mm) |
4.29" x 4.13" x 4.12" (109.0 mm x 104.8 mm x 104.8 mm) |
| Cooling | Passive Cooling | Active Thermoelectric Cooling Sensor Cools to 0 °C at 20 °C Ambient Temperature |
| Cooling Mode Power Consumption | N/A | 12.6 W (Max) |
| Power Supply | Powered by USB 3.0 from Host PC | Camera Powered by USB 3.0 from Host PC Auxillary Power Supply for TE-Cooling (100 - 240 VAC @ 50 - 60 Hz) |

Click to Enlarge
Mechanical Drawing of the CS2100M-USB Camera Housing

Click to Enlarge
Mechanical Drawing of the CC215MU Camera Housing
Camera Back Panel Connector Locations

Back panel connections for the CS2100M-USB Compact Quantalux Camera. For the I/O connector pin assignments, please see the Auxiliary (I/O) Connector section below.

Back panel connections for the CC215MU Cooled Quantalux Camera. For the I/O connector pin assignments, please see the Auxiliary (I/O) Connector section below.
TSI-IOBOB and TSI-IOBOB2 Break-Out Board Connector Locations

Click to Enlarge
TSI-IOBOB

Click to Enlarge
TSI-IOBOB2
| TSI-IOBOB and TSI-IOBOB2 Connector | 8050-CAB1 Connectors | Camera Auxiliary (I/O) Port |
|---|---|---|
 Female 6-Pin Mini Din Female Connector |
 Male 6-Pin Mini Din Male Connector (TSI-IOBOB end of Cable)  Male 12-Pin Hirose Connector (Camera end of Cable) |
 Female 12-Pin Hirose Connector (Auxiliary Port on Camera) |
Auxiliary (I/O) Connector
The cameras and the break-out boards feature female connectors; the cameras have a 12 pin Hirose connector, while the break out boards have a 6-pin Mini-DIN connector. The 8050-CAB1 cable features male connectors on both ends: a 12-pin connector for connecting to the camera and a 6-pin Mini-DIN connector for the break-out boards. Pins 1, 2, 3, 5, and 6 are each connected to the center pin of an SMA connector on the break-out boards, while pin 4 (ground) is connected to each SMA connector housing. To access one of the I/O functions not available with the 8050-CAB1, the user must fabricate a cable using shielded cabling in order for the camera to adhere to CE and FCC compliance; additional details are provided in the camera manual.
| Camera I/O Pin # |
TSI-IOBOB and TSI-IOBOB2 Pin # |
Signal | Description |
|---|---|---|---|
| 1 | - | GND | The electrical ground for the camera signals. |
| 2 | - | GND | The electrical ground for the camera signals. |
| 3 | - | GND | The electrical ground for the camera signals. |
| 4 | 6 | STROBE_OUT / EEP (Output) |
Strobe_Out: An LVTTL output that is high during the actual sensor exposure time when in continuous, overlapped exposure mode. It is typically used to synchronize an external flash lamp or other device with the camera. EEP: Equal Exposure Pulse is available when Equal Exposure pulse is selected in the ThorCam settings. This signal is active from the time when rolling reset is complete to the time when rolling readout commences. It is typically used to synchronize external lamps or other devices with the camera in order to produce uniform exposures. See the Triggering tab for more details. |
| 5 | 3 | TRIGGER_IN (Input) |
An LVTTL input used to trigger exposures. Transitions can occur from the high to low state or from the low to high state as selected in ThorCam; the default is low to high. |
| 6 | 1 | LVAL_OUT (Output) |
Refers to "Line Valid." It is an active-high LVTTL signal and is asserted during the valid pixel period on each line. It returns low during the inter-line period between each line and during the inter-frame period between each frame. |
| 7 | - | OPTO I/O_OUT STROBE (Output) |
This is an optically isolated output signal. The user must provide a pull-up resistor to an external voltage source of 2.5 V to 20 V. The pull-up resistor must limit the current into this pin to <40 mA. The default signal present on pin 7 is the STROBE_OUT signal, which is effectively the Trigger Out signal as well. |
| 8 | - | OPTO I/O_RTN | This is the return connection for the OPTO I/O_OUT output and the OPTO I/O_IN input connections. This must be connected to the pull-up source for OPTO I/O_OUT or the driving source for the OPTO I/O_IN signals. |
| 9 | - | OPTO I/O_IN (Input) |
This is an optically isolated input signal used to trigger exposures. The user must provide a driving source from 3.3 V to 10 V. An internal series resistor limits the current to <50 mA at 10 V. The minimum trigger pulse-width is 100 µs. |
| 10 | 4 | GND | The electrical ground for the camera signals. |
| 11 | - | GND | The electrical ground for the camera signals. |
| 12 | 5 | FVAL_OUT (Output) |
Refers to "Frame Valid." It is a LVTTL output that is high during active readout lines and returns low between frames. |

Click to Enlarge
CS2100M-USB Compact sCMOS Camera with Included Accessories
In Addition to the Camera, the CS2100M-USB Includes the Following:
- 3 m long USB 3.0 Cable (Micro B to A)
- Wrench to Loosen Optical Assembly (Item # SPW502)
- Lens Mount Dust Cap
- CD with ThorCam Software
- Quick-Start Guide and Manual Download Information Card

Click to Enlarge
CC215MU Cooled sCMOS Camera with Included Accessories
In Addition to the Camera, the CC215MU Includes the Following:
- 3 m Long USB 3.0 Cable (Micro B to A) with Bracket for PC Connection (Not Shown)
- 5/64" Hex Key to Remove C-Mount Adapter
- Lens Cap
- 5 V / 3 A AC-DC Converter (For TEC Cooling Power Only)
- Quick-Start Guide and Manual Download Information Card
ThorCam™
ThorCam is a powerful image acquisition software package that is designed for use with our cameras on 32- and 64-bit Windows® 7 or 10 systems. This intuitive, easy-to-use graphical interface provides camera control as well as the ability to acquire and play back images. Single image capture and image sequences are supported. Please refer to the screenshots below for an overview of the software's basic functionality.
Application programming interfaces (APIs) and a software development kit (SDK) are included for the development of custom applications by OEMs and developers. The SDK provides easy integration with a wide variety of programming languages, such as C, C++, C#, Python, and Visual Basic .NET. Support for third-party software packages, such as LabVIEW, MATLAB, and µManager* is available. We also offer example Arduino code for integration with our TSI-IOBOB2 Interconnect Break-Out Board.
*µManager control of Zelux and 1.3 MP Kiralux cameras is not currently supported. When controlling the Kiralux Polarization-Sensitive Camera using µManager, only intensity images can be taken; the ThorCam software is required to produce images with polarization information.
| Recommended System Requirementsa | |
|---|---|
| Operating System | Windows® 7 or 10 (64 Bit) |
| Processor (CPU)b | ≥3.0 GHz Intel Core (i5 or Higher) |
| Memory (RAM) | ≥8 GB |
| Hard Drivec | ≥500 GB (SATA) Solid State Drive (SSD) |
| Graphics Cardd | Dedicated Adapter with ≥256 MB RAM |
| Motherboard | USB 3.0 (-USB) Cameras: Integrated Intel USB 3.0 Controller or One Unused PCIe x1 Slot (for Item # USB3-PCIE) GigE (-GE) Cameras: One Unused PCIe x1 Slot |
| Connectivity | USB or Internet Connectivity for Driver Installation |
Software
Version 3.5.1
Click the button below to visit the ThorCam software page.
Example Arduino Code for TSI-IOBOB2 Board
Click the button below to visit the download page for the sample Arduino programs for the TSI-IOBOB2 Shield for Arduino. Three sample programs are offered:
- Trigger the Camera at a Rate of 1 Hz
- Trigger the Camera at the Fastest Possible Rate
- Use the Direct AVR Port Mappings from the Arduino to Monitor Camera State and Trigger Acquisition
Click the Highlighted Regions to Explore ThorCam Features

Camera Control and Image Acquisition
Camera Control and Image Acquisition functions are carried out through the icons along the top of the window, highlighted in orange in the image above. Camera parameters may be set in the popup window that appears upon clicking on the Tools icon. The Snapshot button allows a single image to be acquired using the current camera settings.
The Start and Stop capture buttons begin image capture according to the camera settings, including triggered imaging.
Timed Series and Review of Image Series
The Timed Series control, shown in Figure 1, allows time-lapse images to be recorded. Simply set the total number of images and the time delay in between captures. The output will be saved in a multi-page TIFF file in order to preserve the high-precision, unaltered image data. Controls within ThorCam allow the user to play the sequence of images or step through them frame by frame.
Measurement and Annotation
As shown in the yellow highlighted regions in the image above, ThorCam has a number of built-in annotation and measurement functions to help analyze images after they have been acquired. Lines, rectangles, circles, and freehand shapes can be drawn on the image. Text can be entered to annotate marked locations. A measurement mode allows the user to determine the distance between points of interest.
The features in the red, green, and blue highlighted regions of the image above can be used to display information about both live and captured images.
ThorCam also features a tally counter that allows the user to mark points of interest in the image and tally the number of points marked (see Figure 2). A crosshair target that is locked to the center of the image can be enabled to provide a point of reference.
Third-Party Applications and Support
ThorCam is bundled with support for third-party software packages such as LabVIEW, MATLAB, and .NET. Both 32- and 64-bit versions of LabVIEW and MATLAB are supported. A full-featured and well-documented API, included with our cameras, makes it convenient to develop fully customized applications in an efficient manner, while also providing the ability to migrate through our product line without having to rewrite an application.

Click to Enlarge
Figure 1: A timed series of 10 images taken at 1 second intervals is saved as a multipage TIFF.

Click to Enlarge
Figure 2: A screenshot of the ThorCam software showing some of the analysis and annotation features. The Tally function was used to mark four locations in the image. A blue crosshair target is enabled and locked to the center of the image to provide a point of reference.
Performance Considerations
Please note that system performance limitations can lead to "dropped frames" when image sequences are saved to the disk. The ability of the host system to keep up with the camera's output data stream is dependent on multiple aspects of the host system. Note that the use of a USB hub may impact performance. A dedicated connection to the PC is preferred. USB 2.0 connections are not supported.
First, it is important to distinguish between the frame rate of the camera and the ability of the host computer to keep up with the task of displaying images or streaming to the disk without dropping frames. The frame rate of the camera is a function of exposure and readout (e.g. clock, ROI) parameters. Based on the acquisition parameters chosen by the user, the camera timing emulates a digital counter that will generate a certain number of frames per second. When displaying images, this data is handled by the graphics system of the computer; when saving images and movies, this data is streamed to disk. If the hard drive is not fast enough, this will result in dropped frames.
One solution to this problem is to ensure that a solid state drive (SSD) is used. This usually resolves the issue if the other specifications of the PC are sufficient. Note that the write speed of the SSD must be sufficient to handle the data throughput.
Larger format images at higher frame rates sometimes require additional speed. In these cases users can consider implementing a RAID0 configuration using multiple SSDs or setting up a RAM drive. While the latter option limits the storage space to the RAM on the PC, this is the fastest option available. ImDisk is one example of a free RAM disk software package. It is important to note that RAM drives use volatile memory. Hence it is critical to ensure that the data is moved from the RAM drive to a physical hard drive before restarting or shutting down the computer to avoid data loss.
Triggered Camera Operation
Our scientific cameras have three externally triggered operating modes: streaming overlapped exposure, asynchronous triggered acquisition, and bulb exposure driven by an externally generated trigger pulse. The trigger modes operate independently of the readout (e.g., binning) settings as well as gain and offset. Figures 1 through 3 show the timing diagrams for these trigger modes, assuming an active low external TTL trigger.

Click to Enlarge
Figure 1: Streaming overlapped exposure mode. When the external trigger goes low, the exposure begins, and continues for the software-selected exposure time, followed by the readout. This sequence then repeats at the set time interval. Subsequent external triggers are ignored until the camera operation is halted. For the definition of the TTL signals, please see the Pin Diagrams tab.

Click to Enlarge
Figure 2: Asynchronous triggered acquisition mode. When the external trigger signal goes low, an exposure begins for the preset time, and then the exposure is read out of the camera. During the readout time, the external trigger is ignored. Once a single readout is complete, the camera will begin the next exposure only when the external trigger signal goes low.

Click to Enlarge
Figure 3: Bulb exposure mode. The exposure begins when the external trigger signal goes low and ends when the external trigger signal goes high. Trigger signals during camera readout are ignored.

Click to Enlarge
Figure 4: The ThorCam Camera Settings window. The red and blue highlighted regions indicate the trigger settings as described in the text.
External triggering enables these cameras to be easily integrated into systems that require the camera to be synchronized to external events. The Strobe Output goes high to indicate exposure; the strobe signal may be used in designing a system to synchronize external devices to the camera exposure. External triggering requires a connection to the auxiliary port of the camera. We offer the 8050-CAB1 auxiliary cable as an optional accessory. Two options are provided to "break out" individual signals. The TSI-IOBOB provides SMA connectors for each individual signal. Alternately, the TSI-IOBOB2 also provides the SMA connectors with the added functionality of a shield for Arduino boards that allows control of other peripheral equipment. More details on these three optional accessories are provided below.
Trigger settings are adjusted using the ThorCam software. Figure 4 shows the Camera Settings window, with the trigger settings highlighted with red and blue squares. Settings can be adjusted as follows:
- "Hardware Trigger" (Red Highlight) Set to "None": The camera will simply acquire the number of frames in the "Frames per Trigger" box when the capture button is pressed in ThorCam.
- "Hardware Trigger" Set to "Standard": There are Two Possible Scenarios:
- "Frames per Trigger" (Blue Highlight) Set to Zero or >1: The camera will operate in streaming overlapped exposure mode (Figure 1).
- "Frames per Trigger" Set to 1: Then the camera will operate in asynchronous triggered acquisition mode (Figure 2).
- "Hardware Trigger" Set to "Bulb (PDX) Mode": The camera will operate in bulb exposure mode, also known as Pulse Driven Exposure (PDX) mode (Figure 3).
In addition, the polarity of the trigger can be set to "On High" (exposure begins on the rising edge) or "On Low" (exposure begins on the falling edge) in the "Hardware Trigger Polarity" box (highlighted in red in Figure 4).
Equal Exposure Pulse (EEP) Mode
The Equal Exposure Pulse (EEP) is an output signal available on the Quantalux camera's I/O connector. When selected in the ThorCam settings dialog, the STROBE_OUT signal is reconfigured to be active only after the CMOS sensor's rolling reset function has completed. The signal will remain active until the sensor's rolling readout function begins. This means that the signal is active only during the time when all of the sensor's pixels have been reset and are actively integrating. The resulting image will not show an exposure gradient typical of rolling reset sensors. Figure 5 shows an example of a strobe-driven exposure, where STROBE_OUT is used to trigger an external light source; the resulting image shows a gradient as not all sensor rows are integrating charge for the same length of time when the light source is on. Figure 6 shows an example of an EEP exposure: the exposure time is lengthened, and the trigger output signal shifted to the time when all rows are integrating charge, yielding an image with equal illumination across the frame.
Please note that EEP will have no effect on images that are constantly illuminated. There are several conditions that must be met to use EEP mode; these are detailed in the User Guide.

Click to Enlarge
Figure 5: A timing example for an exposure using STROBE_OUT to trigger an external light source during exposure. A gradient is formed across the image since the sensor rows are not integrating charge for the same length of time the light source is on.

Click to Enlarge
Figure 6: A timing example for an exposure using EEP. The image is free of gradients, since the EEP signal triggers the light source only while all sensor rows are integrating charge.
Example Camera Triggering Configuration using Scientific Camera Accessories

Figure 5: A schematic showing a system using the TSI-IOBOB2 to facilitate system integration and control.
While the diagram shows the back panel of our Quantalux™ sCMOS Camera, our Scientific CCD cameras can be used as well.
As an example of how camera triggering can be integrated into system control is shown in Figure 5. In the schematic, the camera is connected to the TSI-IOBOB2 break-out board / shield for Arduino using a 8050-CAB1 cable. The pins on the shield can be used to deliver signals to simultaneously control other peripheral devices, such as light sources, shutters, or motion control devices. Once the control program is written to the Arduino board, the USB connection to the host PC can be removed, allowing for a stand-alone system control platform; alternately, the USB connection can be left in place to allow for two-way communication between the Arduino and the PC. Configuring the external trigger mode is done using ThorCam as described above.
Camera Noise and Temperature
Overview
When purchasing a camera, an important consideration is whether or not the application will require a cooled sensor. Generally, most applications have high signal levels and do not require cooling. However, for certain situations, generally under low light levels where long exposures are necessary, cooling will provide a benefit. In the tutorial below, we derive the following "rule of thumb": for exposures less than 1 second, a standard camera is generally sufficient; for exposures greater than 1 second, cooling could be beneficial; for exposures greater than 5 seconds, cooling is generally recommended; and for exposures above 10 seconds, cooling is usually required. If you have questions about which domain your application will fall, you might consider estimating the signal levels and noise sources by following the steps detailed in the tutorial below, where we present sample calculations using the specifications for our 1.4 megapixel cameras. Alternatively you can contact us, and one of our scientific camera specialists will help you decide which camera is right for you.
Sources of Noise
Noise in a camera image is the aggregate spatial and temporal variation in the measured signal, assuming constant, uniform illumination. There are several components of noise:
- Dark Shot Noise (σD): Dark current is a current that flows even when no photons are incident on the camera. It is a thermal phenomenon resulting from electrons spontaneously generated within the silicon chip (valence electrons are thermally excited into the conduction band). The variation in the amount of dark electrons collected during the exposure is the dark shot noise. It is independent of the signal level but is dependent on the temperature of the sensor as shown in Table 1.
- Read Noise (σR): This is the noise generated in producing the electronic signal. This results from the sensor design but can also be impacted by the design of the camera electronics. It is independent of signal level and temperature of the sensor, and is larger for faster CCD pixel clock rates.
- Photon Shot Noise (σS): This is the statistical noise associated with the arrival of photons at the pixel. Since photon measurement obeys Poisson statistics, the photon shot noise is dependent on the signal level measured. It is independent of sensor temperature.
- Fixed Pattern Noise (σF): This is caused by spatial non-uniformities of the pixels and is independent of signal level and temperature of the sensor. Note that fixed pattern noise will be ignored in the discussion below; this is a valid assumption for the CCD cameras sold here but may need to be included for other non-scientific-grade sensors.
Total Effective Noise
The total effective noise per pixel is the quadrature sum of each of the noise sources listed above:

Here, σD is the dark shot noise, σR is the read noise (for sample calculations, we will use our 1.4 megapixel cameras, which use the ICX285AL sensor. Typically the read noise is less than 10 e- for scientific-grade cameras using the ICX285AL CCD; we will assume a value of 10 e- in this tutorial), and σS is the photon shot noise. If σS>>σD and σS>>σR, then σeff is approximately given by the following:

Again, fixed pattern noise is ignored, which is a good approximation for scientific-grade CCDs but may need to be considered for non-scientific-grade sensors.
| Temperature | Dark Current (ID) |
|---|---|
| -20 °C | 0.1 e-/(s•pixel) |
| 0 °C | 1 e-/(s•pixel) |
| 25 °C | 5 e-/(s•pixel) |

Click to Enlarge
Figure 1: Plot of dark shot noise and read noise as a function of exposure for three sensor temperatures for a sample camera. This plot uses logarithmic scales for both axes.The dotted vertical line at 5 s indicates the values calculated as the example in the text.
Dark Shot Noise and Sensor Temperature
As mentioned above, the dark current is a thermal effect and can therefore be reduced by cooling the sensor. Table 1 lists typical dark current values for a sample camera with a CCD sensor. As the dark current results from spontaneously generated electrons, the dark current is measured by simply "counting" these electrons. Since counting electrons obeys Poisson statistics, the noise associated with the dark current ID is proportional to the square root of the number of dark electrons that accumulate during the exposure. For a given exposure, the dark shot noise, σD, is therefore the square root of the ID value from Table 1 (for a given sensor temperature) multiplied by the exposure time t in seconds:

Since the dark current decreases with decreasing temperature, the associated noise can be decreased by cooling the camera. For example, assuming an exposure of 5 seconds, the dark shot noise levels for the three sensor temperatures listed in the table are


Figure 1, which is a plot of the dark shot noise as a function of exposure for the three temperatures listed in Table 1, illustrates how the dark shot noise increases with increasing exposure. Figure 1 also includes a plot of the upper limit of the read noise.
If the photon shot noise is significantly larger than the dark shot noise, then cooling provides a negligible benefit in terms of the noise, and our standard package cameras will work well.
Photon Shot Noise
If S is the number of "signal" electrons generated when a photon flux of N photons/second is incident on each pixel of a sensor with a quantum efficiency QE and an exposure duration of t seconds, then

From S, the photon shot noise, σS, is given by:

Example Calculations (Using our 1.4 Megapixel Cameras)
If we assume that there is a sufficiently high photon flux and quantum efficiency to allow for a signal S of 10,000 e- to accumulate in a pixel with an exposure of 5 seconds, then the estimated shot noise, σS, would be the square root of 10,000, or 100 e-. The read noise is 10 e- (independent of exposure time). For an exposure of 5 seconds and sensor temperatures of 25, 0, and -25 °C, the dark shot noise is given in equation (4). The effective noise is:


The signal-to-noise ratio (SNR) is a useful figure of merit for image quality and is estimated as:

From Equation 7, the SNR values for the three sensor temperatures are:

As the example shows, there is a negligible benefit to using a cooled camera compared to a non-cooled camera operating at room temperature, and the photon shot noise is the dominant noise source in this example. In this case our standard package cameras should therefore work quite well.
However, if the light levels were lower such that a 100 second exposure was required to achieve 900 e- per pixel, then the shot noise would be 30 e-. The estimated dark shot noise would be 22.4 e- at 25 °C, while at -20 °C the dark shot noise would be 3.2 e-. The total effective noise would be

From Equation 8, the SNR values are

| Exposure | Camera Recommendation |
|---|---|
| <1 s | Standard Non-Cooled Camera Generally Sufficient |
| 1 s to 5 s | Cooled Camera Could Be Helpful |
| 5 s to 10 s | Cooled Camera Recommended |
| >10 s | Cooled Camera Usually Required |
In this example, the dark shot noise is a more significant contributor to the total noise for the 25 °C sensor than for the -25 °C sensor. Depending on the application's noise budget, a cooled camera may be beneficial.
Figure 2 shows plots of the different noise components, including dark shot noise at three sensor temperatures, as a function of exposure time for three photon fluxes. The plots show that dark shot noise is not a significant contributor to total noise except for low signal (and consequently long exposure) situations. While the photon flux levels used for the calculations are given in the figure, it is not necessary to know the exact photon flux level for your application. Figure 2 suggests a general metric based on exposure time that can be used to determine whether a cooled camera is required if the exposure time can be estimated, and these results are summarized in Table 2. If you find that your dominant source of noise is due to the read noise, then we recommend running the camera at a lower CCD pixel clock rate of 20 MHz, since that will offer a lower read noise.


Figure 2: Noise from all sources as a function of exposure for three different photon fluxes: (a) low, (b) medium, and (c) high. In (c) the signal and photon shot noise saturate above approximately 20 seconds because the pixel becomes saturated at the corresponding incident photon levels. A quantum efficiency of 60% was used for the calculations. Note that these plots use logarithmic scales for both axes.
Other Considerations
Thermoelectric cooling should also be considered for long exposures even where the dark shot noise is not a significant contributor to total noise because cooling also helps to reduce the effects of hot pixels. Hot pixels cause a "star field" pattern that appears under long exposures. Figure 3 shows an example of this star field pattern for images taken using cameras with and without TEC cooling with an exposure of 10 seconds.

(a)

(b)
Figure 3: Images of the "star field" pattern that results from hot pixels using our (a) standard non-cooled camera and (b) our camera cooled to -20 °C. Both images were taken with an exposure of 10 seconds and with a gain of 32 dB (to make the hot pixels more visible). Please note that in order to show the pattern the images displayed here were cropped from the full-resolution 16 bit images. The full size 16 bit images may be downloaded here and viewed with software such as ImageJ, which is a free download.

Insights into Mounting Lenses to Thorlabs' Scientific Cameras
Scroll down to read about compatibility between lenses and cameras of different mount types, with a focus on Thorlabs' scientific cameras.
- Can C-mount and CS-mount cameras and lenses be used with each other?
- Do Thorlabs' scientific cameras need an adapter?
- Why can the FFD be smaller than the distance separating the camera's flange and sensor?
Click here for more insights into lab practices and equipment.
Can C-mount and CS-mount cameras and lenses be used with each other?

Click to Enlarge
Figure 1: C-mount lenses and cameras have the same flange focal distance (FFD), 17.526 mm. This ensures light through the lens focuses on the camera's sensor. Both components have 1.000"-32 threads, sometimes referred to as "C-mount threads".

Click to Enlarge
Figure 2: CS-mount lenses and cameras have the same flange focal distance (FFD), 12.526 mm. This ensures light through the lens focuses on the camera's sensor. Their 1.000"-32 threads are identical to threads on C-mount components, sometimes referred to as "C-mount threads."
The C-mount and CS-mount camera system standards both include 1.000"-32 threads, but the two mount types have different flange focal distances (FFD, also known as flange focal depth, flange focal length, register, flange back distance, and flange-to-film distance). The FFD is 17.526 mm for the C-mount and 12.526 mm for the CS-mount (Figures 1 and 2, respectively).
Since their flange focal distances are different, the C-mount and CS-mount components are not directly interchangeable. However, with an adapter, it is possible to use a C-mount lens with a CS-mount camera.
Mixing and Matching
C-mount and CS-mount components have identical threads, but lenses and cameras of different mount types should not be directly attached to one another. If this is done, the lens' focal plane will not coincide with the camera's sensor plane due to the difference in FFD, and the image will be blurry.
With an adapter, a C-mount lens can be used with a CS-mount camera (Figures 3 and 4). The adapter increases the separation between the lens and the camera's sensor by 5.0 mm, to ensure the lens' focal plane aligns with the camera's sensor plane.
In contrast, the shorter FFD of CS-mount lenses makes them incompatible for use with C-mount cameras (Figure 5). The lens and camera housings prevent the lens from mounting close enough to the camera sensor to provide an in-focus image, and no adapter can bring the lens closer.
It is critical to check the lens and camera parameters to determine whether the components are compatible, an adapter is required, or the components cannot be made compatible.
1.000"-32 Threads
Imperial threads are properly described by their diameter and the number of threads per inch (TPI). In the case of both these mounts, the thread diameter is 1.000" and the TPI is 32. Due to the prevalence of C-mount devices, the 1.000"-32 thread is sometimes referred to as a "C-mount thread." Using this term can cause confusion, since CS-mount devices have the same threads.
Measuring Flange Focal Distance
Measurements of flange focal distance are given for both lenses and cameras. In the case of lenses, the FFD is measured from the lens' flange surface (Figures 1 and 2) to its focal plane. The flange surface follows the lens' planar back face and intersects the base of the external 1.000"-32 threads. In cameras, the FFD is measured from the camera's front face to the sensor plane. When the lens is mounted on the camera without an adapter, the flange surfaces on the camera front face and lens back face are brought into contact.

Click to Enlarge
Figure 5: A CS-mount lens is not directly compatible with a C-mount camera, since the light focuses before the camera's sensor. Adapters are not useful, since the solution would require shrinking the flange focal distance of the camera (blue arrow).

Click to Enlarge
Figure 4: An adapter with the proper thickness moves the C-mount lens away from the CS-mount camera's sensor by an optimal amount, which is indicated by the length of the purple arrow. This allows the lens to focus light on the camera's sensor, despite the difference in FFD.

Click to Enlarge
Figure 3: A C-mount lens and a CS-mount camera are not directly compatible, since their flange focal distances, indicated by the blue and yellow arrows, respectively, are different. This arrangement will result in blurry images, since the light will not focus on the camera's sensor.
Date of Last Edit: July 21, 2020
Do Thorlabs' scientific cameras need an adapter?

Click to Enlarge
Figure 6: An adapter can be used to optimally position a C-mount lens on a camera whose flange focal distance is less than 17.526 mm. This sketch is based on a Zelux camera and its SM1A10Z adapter.

Click to Enlarge
Figure 7: An adapter can be used to optimally position a CS-mount lens on a camera whose flange focal distance is less than 12.526 mm. This sketch is based on a Zelux camera and its SM1A10 adapter.
All Kiralux™ and Quantalux® scientific cameras are factory set to accept C-mount lenses. When the attached C-mount adapters are removed from the passively cooled cameras, the
The SM1 threads integrated into the camera housings are intended to facilitate the use of lens assemblies created from Thorlabs components. Adapters can also be used to convert from the camera's C-mount configurations. When designing an application-specific lens assembly or considering the use of an adapter not specifically designed for the camera, it is important to ensure that the flange focal distances (FFD) of the camera and lens match, as well as that the camera's sensor size accommodates the desired field of view (FOV).
Made for Each Other: Cameras and Their Adapters
Fixed adapters are available to configure the Zelux cameras to meet C-mount and CS-mount standards (Figures 6 and 7). These adapters, as well as the adjustable C-mount adapters attached to the passively cooled Kiralux and Quantalux cameras, were designed specifically for use with their respective cameras.
While any adapter converting from SM1 to
The position of the lens' focal plane is determined by a combination of the lens' FFD, which is measured in air, and any refractive elements between the lens and the camera's sensor. When light focused by the lens passes through a refractive element, instead of just travelling through air, the physical focal plane is shifted to longer distances by an amount that can be calculated. The adapter must add enough separation to compensate for both the camera's FFD, when it is too short, and the focal shift caused by any windows or filters inserted between the lens and sensor.
Flexiblity and Quick Fixes: Adjustable C-Mount Adapter
Passively cooled Kiralux and Quantalux cameras consist of a camera with SM1 internal threads, a window or filter covering the sensor and secured by a retaining ring, and an adjustable C-mount adapter.
A benefit of the adjustable C-mount adapter is that it can tune the spacing between the lens and camera over a 1.8 mm range, when the window / filter and retaining ring are in place. Changing the spacing can compensate for different effects that otherwise misalign the camera's sensor plane and the lens' focal plane. These effects include material expansion and contraction due to temperature changes, positioning errors from tolerance stacking, and focal shifts caused by a substitute window or filter with a different thickness or refractive index.
Adjusting the camera's adapter may be necessary to obtain sharp images of objects at infinity. When an object is at infinity, the incoming rays are parallel, and location of the focus defines the FFD of the lens. Since the actual FFDs of lenses and cameras may not match their intended FFDs, the focal plane for objects at infinity may be shifted from the sensor plane, resulting in a blurry image.
If it is impossible to get a sharp image of objects at infinity, despite tuning the lens focus, try adjusting the camera's adapter. This can compensate for shifts due to tolerance and environmental effects and bring the image into focus.
Date of Last Edit: Aug. 2, 2020
Why can the FFD be smaller than the distance separating the camera's flange and sensor?

Click to Enlarge
Figure 9: Refraction causes the ray's angle with the optical axis to be shallower in the medium than in air (θm vs. θo ), due to the differences in refractive indices (nm vs. no ). After travelling a distance d in the medium, the ray is only hm closer to the axis. Due to this, the ray intersects the axis Δf beyond the f point.;

Click to Enlarge
Figure 8: A ray travelling through air intersects the optical axis at point f. The ray is ho closer to the axis after it travels across distance d. The refractive index of the air is no .
| Example of Calculating Focal Shift | |||
|---|---|---|---|
| Known Information | |||
| C-Mount FFD | f | 17.526 mm | |
| Total Glass Thickness | d | ~1.6 mm | |
| Refractive Index of Air | no | 1 | |
| Refractive Index of Glass | nm | 1.5 | |
| Lens f-Number | f / N | f / 1.4 | |
| Parameter to Calculate |
Exact Equations | Paraxial Approximation |
|
| θo | 20° | ||
| ho | 0.57 mm | --- | |
| θm | 13° | --- | |
| hm | 0.37 mm | --- | |
| Δf | 0.57 mm | 0.53 mm | |
| f + Δf | 18.1 mm | 18.1 mm | |
| Equations for Calculating the Focal Shift (Δf ) | ||
|---|---|---|
| Angle of Ray in Air, from Lens f-Number ( f / N ) |  |
|
| Change in Distance to Axis, Travelling through Air (Figure 8) |  |
|
| Angle of Ray to Axis, in the Medium (Figure 9) |
 |
|
| Change in Distance to Axis, Travelling through Optic (Figure 9) |  |
|
| Focal Shift Caused by Refraction through Medium (Figure 9) | Exact Calculation |
 |
| Paraxial Approximation |
 |
|

Click to Enlarge
Figure 11: Tolerance and / or temperature effects may result in the lens and camera having different FFDs. If the FFD of the lens is shorter, images of objects at infinity will be excluded from the focal range. Since the system cannot focus on them, they will be blurry.

Click to Enlarge
Figure 10: When their flange focal distances (FFD) are the same, the camera's sensor plane and the lens' focal plane are perfectly aligned. Images of objects at infinity coincide with one limit of the system's focal range.
Flange focal distance (FFD) values for cameras and lenses assume only air fills the space between the lens and the camera's sensor plane. If windows and / or filters are inserted between the lens and camera sensor, it may be necessary to increase the distance separating the camera's flange and sensor planes to a value beyond the specified FFD. A span equal to the FFD may be too short, because refraction through windows and filters bends the light's path and shifts the focal plane farther away.
If making changes to the optics between the lens and camera sensor, the resulting focal plane shift should be calculated to determine whether the separation between lens and camera should be adjusted to maintain good alignment. Note that good alignment is necessary for, but cannot guarantee, an in-focus image, since new optics may introduce aberrations and other effects resulting in unacceptable image quality.
A Case of the Bends: Focal Shift Due to Refraction
While travelling through a solid medium, a ray's path is straight (Figure 8). Its angle
When an optic with plane-parallel sides and a higher refractive index
While travelling through the optic, the ray approaches the optical axis at a slower rate than a ray travelling the same distance in air. After exiting the optic, the ray's angle with the axis is again θo , the same as a ray that did not pass through the optic. However, the ray exits the optic farther away from the axis than if it had never passed through it. Since the ray refracted by the optic is farther away, it crosses the axis at a point shifted Δf beyond the other ray's crossing. Increasing the optic's thickness widens the separation between the two rays, which increases Δf.
To Infinity and Beyond
It is important to many applications that the camera system be capable of capturing high-quality images of objects at infinity. Rays from these objects are parallel and focused to a point closer to the lens than rays from closer objects (Figure 9). The FFDs of cameras and lenses are defined so the focal point of rays from infinitely distant objects will align with the camera's sensor plane. When a lens has an adjustable focal range, objects at infinity are in focus at one end of the range and closer objects are in focus at the other.
Different effects, including temperature changes and tolerance stacking, can result in the lens and / or camera not exactly meeting the FFD specification. When the lens' actual FFD is shorter than the camera's, the camera system can no longer obtain sharp images of objects at infinity (Figure 11). This offset can also result if an optic is removed from between the lens and camera sensor.
An approach some lenses use to compensate for this is to allow the user to vary the lens focus to points "beyond" infinity. This does not refer to a physical distance, it just allows the lens to push its focal plane farther away. Thorlabs' Kiralux™ and Quantalux® cameras include adjustable C-mount adapters to allow the spacing to be tuned as needed.
If the lens' FFD is larger than the camera's, images of objects at infinity fall within the system's focal range, but some closer objects that should be within this range will be excluded. This situation can be caused by inserting optics between the lens and camera sensor. If objects at infinity can still be imaged, this can often be acceptable.
Not Just Theory: Camera Design Example
The C-mount, hermetically sealed, and TE-cooled Quantalux camera has a fixed 18.1 mm spacing between its flange surface and sensor plane. However, the FFD (f ) for C-mount camera systems is 17.526 mm. The camera's need for greater spacing becomes apparent when the focal shift due to the window soldered into the hermetic cover and the glass covering the sensor are taken into account. The results recorded in the table beneath Figure 9 show that both exact and paraxial equations return a required total spacing of 18.1 mm.
Date of Last Edit: July 31, 2020

About Thorlabs Scientific Imaging
Thorlabs Scientific Imaging (TSI) is a multi-disciplinary team dedicated to solving the most challenging imaging problems. We design and manufacture low-noise, high performance scientific cameras, interface devices, and software at our facility in Austin, Texas.
A Message from TSI's General Manager
As a researcher, you are accustomed to solving difficult problems but may be frustrated by the inadequacy of the available instrumentation and tools. The product development team at Thorlabs Scientific Imaging is continually looking for new challenges to push the boundaries of Scientific Cameras using various sensor technologies. We welcome your input in order to leverage our team of senior research and development engineers to help meet your advanced imaging needs.
Thorlabs' purpose is to support advances in research through our product offerings. Your input will help us steer the direction of our scientific camera product line to support these advances. If you have a challenging application that requires a more advanced scientific camera than is currently available, I would be excited to hear from you.

Sincerely,
Jason Mills
General Manager
Thorlabs Scientific Imaging
| Posted Comments: | |
Daniel de Malmazet
(posted 2020-12-17 18:16:17.37) Hi, Could you please confirm whether this camera is supported by the ThorImage Ls software?
Thanks YLohia
(posted 2020-12-18 11:46:43.0) Hello, thank you for contacting Thorlabs. Yes, the Quantalux is fully supported by ThorImage LS - it is the standard camera we sell with the 2P system. Daniel Larrañaga
(posted 2020-09-24 14:53:14.727) Hello. Can you help me with a problema with a CS2100M-USB camera? Sometimes when I try to connect to my computer, the status led keeps in orange color and the software launch a message with code error 1002. In this situations I need to reconnect a lot of times the camera to the computer until in a fortuitous event the led changes to blue and the software recognizes the device. I sent a email to techinical support but have not recived a answer to this problem. YLohia
(posted 2020-09-24 03:31:54.0) Hello, thank you for contacting Thorlabs. We received your email a few hours ago. Based on your description, it sounds like this issue is coming from the USB on either the camera or the PC. Please test this with a different USB cable. We have reached out to you directly to troubleshoot this. user
(posted 2020-09-03 17:32:07.66) Can you better specify the main differencies between the CS2100M-USB and the CC215MU? In particular what is the difference in terms of readout noise and dark current YLohia
(posted 2020-09-22 09:30:45.0) Thank you for contacting Thorlabs. The readout noise is not strongly temperature dependent, hence the values are essentially the same and are specified as such. Dark current is very strongly temperature-dependent, and the most obvious impact of cooling is the reduction of hot pixels in the CC251MU. However, those are outliers, and would not be represented a mean dark current measurement. The dark current, when the CC215MU's cooler is energized and the camera is at equilibrium at a 20 deg C ambient temperature, is approximately 0.18 electrons per pixel per second. user
(posted 2020-03-31 07:47:58.487) Hi are you planning to release NIR-Enhanced sCMOS? YLohia
(posted 2020-03-31 10:22:24.0) Hello, thank you for contacting Thorlabs. While we currently do not have any plans of releasing an NIR-enhanced version of the CS2100M-USB, we did just release the CS135MUN, which is an NIR-Enhanced CMOS Camera. MUSA AYDIN
(posted 2019-11-08 15:07:42.693) Dear Thorlabs employee,
I'm currently using CS2100M-USB Quantalux® sCMOS Camera. I would have a question about the use of this product. Using the sample codes found in the thorcam installation folder with windows operating system and matlab, I get the image from the camera along with the matlab. I'm loading the camera's .dlls using the NET.addAssembly ([pwd,/Thorlabs.TSI.TLCamera.dll']) command.
Everything goes very well until this moment but now I have to switch to linux (ubuntu) operating system. how to use this camera with matlab on linux operating system i haven't done it yet. .net dlls cannot be used with linux. Is it possible to use the camera via mex file with linux and matlab? Is there a matlab mex file you share?
Thank you in advance for your help and support.
Best regards. nbayconich
(posted 2019-11-11 01:17:27.0) Thank you for contacting Thorlabs. We unfortunately do not support MatLab with Linux OS systems at the moment, we use .NET to interface MatLab & LabVIEW and .NET is a Microsoft Windows framework only. We do however offer support for Python and C/C++ with our scientific cameras which could be used as an alternative method. Laszlo Barna
(posted 2019-09-25 08:31:22.987) Dear ThorLabs,
Could you please share how did you calculated the 87dB dynamic range for the CS2100M-USB camera?
thanks,
Laszlo Barna
Core Facility Manager YLohia
(posted 2019-10-22 02:24:58.0) Hello Laszlo, thank you for contacting Thorlabs. This was computed using the equation 20*log(FullWellElectrons/ReadNoise) = 20*Log(23000/1) = 87 dB. JIAJI LI
(posted 2019-06-05 15:59:42.2) Hello, I am trying to connect CS2100M-USB camera to my commuter, and I have downloaded and installed corresponding USB type camera driver. But the camera is recognized as "Cypress FX3 USB BootLoader Device" in the Device Manager, and the Statues LED is always on and color is yellow. And the Thorlabs software (ThorCam) shows there is no camera is detected (after several times refresh).
Could you give me some suggestions why this might be?
Thanks a lot! YLohia
(posted 2019-06-21 10:30:43.0) Hello, thank you for contacting Thorlabs and my apologies for any issues caused by this item. Based on our direct correspondence and troubleshooting, we have decided to bring in this unit for inspection. user
(posted 2018-10-31 09:32:45.943) Hello, I'm trying to use the camera to Micro-Manager, and I have copied the relevant dlls into the Micro-Manager folder, however I keep getting a message that no camera is detected. This despite the fact the camera works fine with the Thorlabs software and the blue light is on. Any suggestions why this might be? Thanks in advance. YLohia
(posted 2018-11-05 11:37:07.0) Hello, thank you for contacting Thorlabs. Please email us at techsupport@thorlabs.com for step-by-step instructions on how to set up uManager with this camera since you did not leave your contact information. craig.ingram
(posted 2018-10-25 22:56:25.36) Can you record the temperature of the camera or sensor while taking frames? YLohia
(posted 2018-10-26 09:03:28.0) Hello, thank you for contacting Thorlabs. Unfortunately, we do not offer the capability to measure temperature of the sensor. mlippert
(posted 2018-07-18 00:09:02.8) Hi, is there a global shutter version planned and if yes, when approximately would be the release? YLohia
(posted 2018-07-19 02:32:13.0) Hello, there are currently no plans for a global shutter version of the Quantalux since the sensor used in it does not support this operation mode. Two alternatives would be to leverage the Equal Exposure Pulse feature on the Quantalux to eliminate the effect of the rolling shutter, or try our recently released CS505MU or CS505CU cameras which use a global shutter. tilburdj
(posted 2018-04-13 14:22:15.51) Hello,
After checking the hardware requirements would this work with an Intel Core i9-7900X Skylake-X 10-Core 3.3 processor? You have i5, i7, and i8 listed as acceptable processors (you may have to correct the i8 listed on the website since it does not exist). mmcclure
(posted 2018-04-18 01:40:06.0) Hello, thank you for contacting Thorlabs. Your 3.3 GHz Intel Core i9 processor satisfies the minimum CPU requirements to run our ThorCam software. As mentioned on the Software tab above, we recommend an Intel Core i5 or Higher architecture with a speed ≥3.0 GHz. shiner80
(posted 2018-03-29 17:03:29.557) I would also need to know when the drivers/SDK for using the CS2100m-usb with micromanager will be provided as it is basically the reason why I buyed this camera.
Thanks,
Davide YLohia
(posted 2018-04-10 08:33:07.0) Hello, thank you for contacting Thorlabs. CS2100M-USB is now compatible with MicroManager. user
(posted 2018-03-29 10:53:17.753) When would the software of CS2100M-USB become compatible with MicroManager? Thanks YLohia
(posted 2018-04-10 08:33:06.0) Hello, thank you for contacting Thorlabs. CS2100M-USB is now compatible with MicroManager. Roger.John
(posted 2017-12-27 10:49:25.637) Hello, do you offer a Linux SDK? tfrisch
(posted 2018-01-04 01:37:08.0) Hello, thank you for contacting Thorlabs. While we don't currently have a complete SDK, I can reach out to you with the details we do have. max.ulbrich
(posted 2017-12-19 14:01:58.38) Do you have information on the dark current?
Is it possible to have a demo device for testing? tfrisch
(posted 2018-01-16 02:41:29.0) Hello, thank you for contacting Thorlabs. The dark current for the sCMOS sensor (as provided by the manufacturer) is 20 e/p/s at 20C. We will reach out to you directly about the demo. user
(posted 2017-10-19 13:50:35.92) How exactly is the hardware binning achieved? Is the mean of the pixels calculated or are the values simply added, forgoing the possibility to use binning under conditions where the total light exposure on the binned pixels exceeds the well depth of a single pixel? tfrisch
(posted 2017-11-15 04:19:26.0) Hello, thank you for contacting Thorlabs. The binning is performed on-camera in the digital domain, since charge-domain binning is not possible. It is a sum, not an average, so total light exposure should be monitored to avoid saturation. g.whyte
(posted 2017-10-04 14:02:29.73) What are the frame rates at 640 x 480, 320 x 240 and 64 x 48 for direct comparison to the 340M "Scientific Cameras for Microscopy: Fast Frame Rate"? tfrisch
(posted 2017-10-05 02:30:14.0) Hello, thank you for your feedback. You can use the below data. This is changing the region of interest rather than binning. sCMOS does not have on-chip binning like some CCD cameras, so binning will not increase frame rate. Decreasing the region of interest will decrease field of view while preserving resolution. I will also send it to you directly by email.
Data Rate=30FPS
Exposure=1ms
640x480=70fps
320x240=139.5fps
64x48=675fps
Data Rate=50FPS
Exposure=1ms
640x480=114.6fps
320x240=228.3fps
64x48=969fps |

Thorlabs offers four families of scientific cameras: Zelux™, Kiralux®, Quantalux®, and Scientific CCD. Zelux cameras are designed for general-purpose imaging and provide high imaging performance while maintaining a small footprint. Kiralux cameras have CMOS sensors in monochrome, color, NIR-enhanced, or polarization-sensitive versions and are available in compact, passively cooled housings; the CC505MU camera incorporates a hermetically sealed, TE-cooled housing. The polarization-sensitive Kiralux camera incorporates an integrated micropolarizer array that, when used with our ThorCam™ software package, captures images that illustrate degree of linear polarization, azimuth, and intensity at the pixel level. Our Quantalux monochrome sCMOS cameras feature high dynamic range combined with extremely low read noise for low-light applications. They are available in either a compact, passively cooled housing or a hermetically sealed, TE-cooled housing. We also offer scientific CCD cameras with a variety of features, including versions optimized for operation at UV, visible, or NIR wavelengths; fast-frame-rate cameras; TE-cooled or non-cooled housings; and versions with the sensor face plate removed. The tables below provide a summary of our camera offerings.
| Compact Scientific Cameras | |||||||
|---|---|---|---|---|---|---|---|
| Camera Type | Zelux™ CMOS | Kiralux® CMOS | Quantalux® sCMOS | ||||
| 1.6 MP | 1.3 MP | 2.3 MP | 5 MP | 8.9 MP | 12.3 MP | 2.1 MP | |
| Item # | Monochrome: CS165MUa Color: CS165CUa |
Mono.: CS135MU Color: CS135CU NIR-Enhanced Mono.: CS135MUN |
Mono.: CS235MU Color: CS235CU |
Mono., Passive Cooling: CS505MU Mono., Active Cooling: CC505MU Color: CS505CU Polarization: CS505MUP |
Mono.: CS895MU Color: CS895CU |
Mono.: CS126MU Color: CS126CU |
Monochrome, Passive Cooling: CS2100M-USB Active Cooling: CC215MU |
| Product Photos (Click to Enlarge) |
 |
 |
 |
||||
| Electronic Shutter | Global Shutter | Global Shutter | Rolling Shutterb | ||||
| Sensor Type | CMOS | CMOS | sCMOS | ||||
| Number of Pixels (H x V) |
1440 x 1080 | 1280 x 1024 | 1920 x 1200 | 2448 x 2048 | 4096 x 2160 | 4096 x 3000 | 1920 x 1080 |
| Pixel Size | 3.45 µm x 3.45 µm | 4.8 µm x 4.8 µm | 5.86 µm x 5.86 µm | 3.45 µm x 3.45 µm | 5.04 µm x 5.04 µm | ||
| Optical Format |
1/2.9" (6.2 mm Diag.) |
1/2" (7.76 mm Diag.) |
1/1.2" (13.4 mm Diag.) |
2/3" (11 mm Diag.) |
1" (16 mm Diag.) |
1.1" (17.5 mm Diag.) |
2/3" (11 mm Diag.) |
| Peak Quantum Efficiency (Click for Plot) |
Monochrome: 69% at 575 nm Color: Click for Plot |
Monochrome: 59% at 550 nm Color: Click for Plot NIR: 60% at 600 nm |
Monochrome: 78% at 500 nm Color: Click for Plot |
Monochrome & Polarization: 72% (525 to 580 nm) Color: Click for Plot |
Monochrome: 72% (525 to 580 nm) Color: Click for Plot |
Monochrome: 72% (525 to 580 nm) Color: Click for Plot |
Monochrome: 61% (at 600 nm) |
| Max Frame Rate (Full Sensor) |
34.8 fps | 92.3 fps | 39.7 fps | 35 fps | 20.8 fps | 14.6 fps | 50 fps |
| Read Noise | <4.0 e- RMS | <7.0 e- RMS | <7.0 e- RMS | <2.5 e- RMS | <1 e- Median RMS; <1.5 e- RMS | ||
| Digital Output |
10 Bit (Max) | 10 Bit (Max) | 12 Bit (Max) | 16 Bit (Max) | |||
| PC Interface | USB 3.0 | ||||||
| Available Fanless Cooling |
N/A | N/A | N/A | 0 °C at 20 °C Ambient (CC505MU Only) | N/A | 0 °C at 20 °C Ambient (CC215MU Only) |
|
| Housing Size (Click for Details) |
0.59" x 1.72" x 1.86" (15.0 x 43.7 x 47.2 mm3) |
Passively Cooled CMOS Camera TE-Cooled CMOS Camera |
Passively Cooled sCMOS Camera TE-Cooled sCMOS Camera |
||||
| Typical Applications |
General Purpose Imaging, Brightfield Microscopy, Machine Vision & Robotics, UAV, Drone, & Handheld Imaging, Inspection, Monitoring |
VIS/NIR Imaging, Electrophysiology/Brain Slice Imaging, Materials Inspection, Multispectral Imaging, Ophthalmology/Retinal Imaging, Vascular Imaging, Laser Speckle Imaging, Semiconductor Inspection, Fluorescence Microscopy, Brightfield Microscopy |
Fluorescence Microscopy, Immunohistochemistry, Machine Vision, Inspection, General Purpose Imaging |
Mono. & Color: Fluorescence Microscopy, Immunohistochemistry, Machine Vision & Inspection Polarization: Machine Vision & Inspection, Transparent Material Detection, Surface Reflection Reduction |
Fluorescence Microscopy, Immunohistochemistry, Large FOV Slide Imaging, Machine Vision, Inspection |
Fluorescence Microscopy, VIS/NIR Imaging, Quantum Dots, Autofluorescence, Materials Inspection, Multispectral Imaging |
|
| Scientific CCD Cameras | |||||||
|---|---|---|---|---|---|---|---|
| Camera Type | Fast Frame Rate VGA CCD |
1.4 MP CCD | 4 MP CCD | 8 MP CCD | |||
| Item # Prefix | Monochrome: 340M |
UV-Enhanced Monochrome: 340UV |
Monochrome: 1501M Color: 1501C |
Monochrome: 4070M Color: 4070C |
Monochrome: 8051M Color: 8051C |
Monochrome, No Sensor Face Plate: S805MU |
|
| Product Photo (Click to Enlarge) |
 |
 |
|
|
 |
||
| Electronic Shutter | Global Shutter | ||||||
| Sensor Type | CCD | ||||||
| Number of Pixels (H x V) |
640 x 480 | 1392 x 1040 | 2048 x 2048 | 3296 x 2472 | |||
| Pixel Size | 7.4 µm x 7.4 µm | 6.45 µm x 6.45 µm | 7.4 µm x 7.4 µm | 5.5 µm x 5.5 µm | |||
| Optical Format | 1/3" (5.92 mm Diagonal) | 2/3" (11 mm Diagonal) | 4/3" (21.4 mm Diagonal) | 4/3" (22 mm Diagonal) | |||
| Peak QE (Click for Plot) |
55% at 500 nm |
10% at 485 nm |
Monochrome: 60% at 500 nm Color: Click for Plot |
Monochrome: 52% at 500 nm Color: Click for Plot |
Monochrome: 51% at 460 nm Color: Click for Plot |
51% at 460 nm | |
| Max Frame Rate (Full Sensor) |
200.7 fps (at 40 MHz Dual-Tap Readout) |
23 fps (at 40 MHz Single-Tap Readout) |
25.8 fps (at 40 MHz Quad-Tap Readout)a |
17.1 fps (at 40 MHz Quad-Tap Readout)b |
17.1 fps (at 40 MHz Quad-Tap Readout) |
||
| Read Noise | <15 e- at 20 MHz | <7 e- at 20 MHz (Standard Models) <6 e- at 20 MHz (-TE Models) |
<12 e- at 20 MHz | <10 e- at 20 MHz | |||
| Digital Output (Max) | 14 Bitc | 14 Bit | 14 Bitc | 14 Bit | |||
| Available Fanless Cooling |
Passive Thermal Management | -20 °C at 20 °C Ambient Temperature | -10 °C at 20 °C Ambient | Passive Thermal Management | |||
| Available PC Interfaces |
USB 3.0 or Gigabit Ethernet | USB 3.0 | |||||
| Housing Dimensions (Click for Details) |
Non-Cooled Scientific CCD Camera |
Cooled Scientific CCD Camera Non-Cooled Scientific CCD Camera |
No Face Plate Scientific CCD Camera |
||||
| Typical Applications | Ca++ Ion Imaging, Particle Tracking, Flow Cytometry, SEM/EBSD, UV Inspection |
Fluorescence Microscopy, VIS/NIR Imaging, Quantum Dots, Multispectral Imaging, Immunohistochemistry (IHC), Retinal Imaging |
Fluorescence Microscopy, Transmitted Light Microscopy, Whole-Slide Microscopy, Electron Microscopy (TEM/SEM), Inspection, Material Sciences |
Fluorescence Microscopy, Whole-Slide Microscopy, Large FOV Slide Imaging, Histopathology, Inspection, Multispectral Imaging, Immunohistochemistry (IHC) |
Beam Profiling & Characterization, Interferometry, VCSEL Inspection, Quantitative Phase-Contrast Microscopy, Ptychography, Digital Holographic Microscopy |
||

 Zoom
Zoom- Fanless Passive Thermal Management
- Compact Housing: 2.77" x 2.38" x 1.88" (70.4 mm x 60.3 mm x 47.6 mm)
- Compatible with 30 mm Cage System
- SM1-Threaded (1.035"-40) Aperture with Adapter for Standard C-Mount (1.000"-32) Compatibility
- Ships with USB 3.0 Cable
The CS2100M-USB Quantalux camera features a compact design that is engineered to provide passive thermal management for the sensor, reducing dark current without need for a cooling fan or thermoelectric cooler. When imaging conditions present high light levels and require short exposure times (less than 500 ms), the passively cooled CS2100M-USB camera is generally sufficient. We strongly recommend the TE-cooled CC215MU camera for applications with low light levels requiring an exposure greater than 500 ms.
The position of the 2/3" format, monochrome sCMOS sensor is indicated by an engraved line on the top of the camera body. The included clear window, which is AR coated for 400 - 700 nm, can be removed and replaced by another Ø1" (Ø25 mm) optic. When using the C-mount adapter, the maximum optic thickness is 0.050" (1.270 mm); otherwise the maximum optic thickness is 0.173" (4.4 mm). Please note that dust and debris may collect on the sensor face plate while the clear window is removed. Care must be taken when cleaning this face plate to avoid damaging the sensor.
A C-mount (1.000"-32) adapter with an adjustable flange focal range of ±1.5 mm is factory installed for out-of-the-box compatibility with many microscopes, machine vision camera lenses, and C-mount extension tubes. A replacement C-Mount adapter, SM1A10A, is available separately below. Removing this adapter exposes SM1 (1.035"-40) threading that can be used to attach a Ø1" Lens Tube. The camera can be connected to our 30 mm cage system via four 4-40 mounting holes on the front of the housing. Two 1/4"-20 tapped holes on opposite sides of the housing provide compatibility with imperial Ø1/2" Posts and many standard tripod mounts. These flexible mounting options and the compact size make this camera the ideal choice for integrating into custom-built imaging systems as well as those based on commercial microscopes.
Quantalux Mounting Features |
||||
 Click to Enlarge Removing the C-mount adapter and locking ring exposes the SM1 (1.035"-40) threading that can be used for custom assemblies using standard Thorlabs components. |
 Click to Enlarge An SM1 Lens Tube installed using the SM1-threaded aperture. |
 Click to Enlarge Four 4-40 tapped holes allow 30 mm Cage System components to be attached to the camera. Pictured is our CP13 Cage Plate with C-mount threading. |
 Click to Enlarge A Quantalux sCMOS camera installed on a Cerna® Microscope using the WFA4100 Camera Tube. |
|


 Zoom
Zoom- Fanless Thermoelectric Cooling
- Housing Dimensions: 4.29" x 4.13" x 4.12" (109.0 mm x 104.8 mm x 104.8 mm)
- Compatible with 60 mm Cage System
- Factory Installed Adapter for Standard C-Mount (1.000"-32) Compatibility
- Ships with USB 3.0 Cable and AC-DC Power Supply
The CC215MU hermetically sealed cooled Quantalux camera is designed with a thermoelectrically cooled chamber inside a large external heat sink to actively cool the
sensor and reduce dark shot noise. This camera is recommended for applications with low light levels requiring an exposure time greater than 500 ms. For high light levels requiring short exposure times (less than 500 ms), the passively cooled CS2100M-USB camera is generally sufficient.
The position of the monochrome, 2/3" format sCMOS sensor is approximately in line with the four front 1/4"-20 mounting holes, one located on each side of the housing. A removable C-mount adapter on the front end of the camera holds a clear protective window, which is AR coated for 400 - 700 nm, and can be removed and replaced by another Ø1" (Ø25 mm) optic up to 0.079" (2.0 mm) thick. Please note that dust and debris may collect on the hermetic chamber glass covering while the clear window is removed. Care must be taken when cleaning this covering to avoid scratching or other damage to the glass.
The factory installed C-mount (1.000"-32) adapter has a fixed flange focal distance and provides out-of-the-box compatibility with many microscopes, machine vision camera lenses, and C-mount extension tubes. The camera can be connected to our 60 mm cage system via four 4-40 mounting holes on the front of the housing, and 1/4"-20 tapped holes on the sides are provided for use with our imperial Ø1" pedestal or pillar posts. These flexible mounting options provide compatibility with commercial microscopes and support integration into home-built imaging systems.
Quantalux Mounting Features |
||||
 Click to Enlarge The included hex key can be used to loosen the three cap screws on the C-mount adapter. An O-ring holds the protective window within the adapter. |
 Click to Enlarge Four 4-40 tapped holes allow 60 mm Cage System components to be attached to the camera. Pictured is our LCP02 Cage Plate Adapter for coupling to 30 mm Cage System components like the SM1-threaded CP33 Cage Plate. |
 Click to Enlarge A CC215MU camera is mounted on a Ø1" pedestal posts using the 1/4"-20 tapped hole on the bottom of the housing. |
 Click to Enlarge A CC215MU camera installed on the LAURE1 Cerna® Trinoculars using a TC1X Camera Tube. |
|


 Zoom
Zoom
Click for Details
A schematic showing a TSI-IOBOB2 connected to an Arduino to trigger a compact scientific camera.


These optional accessories allow for easy use of the auxiliary port of our compact scientific (sCMOS & CMOS) or scientific CCD cameras. These items should be considered when it is necessary to externally trigger the camera, to monitor camera performance with an oscilloscope, or for simultaneous control of the camera with other instruments.
For our USB 3.0 cameras, we also offer a PCIe USB 3.0 card and extra cables for facilitating the connection to the computer.
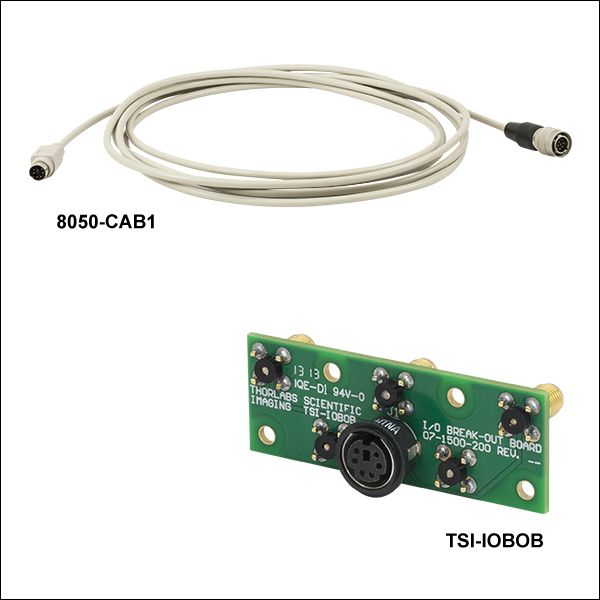
Auxiliary I/O Cable (8050-CAB1)
The 8050-CAB1 is a 10' (3 m) long cable that mates with the auxiliary connector on our scientific cameras* and provides the ability to externally trigger the camera as well as monitor status output signals. One end of the cable features a male 12-pin connector for connecting to the camera, while the other end has a male 6-pin Mini Din connector for connecting to external devices. This cable is ideal for use with our interconnect break-out boards described below. For information on the pin layout, please see the Pin Diagrams tab above.
*The 8050-CAB1 cable is not compatible with our former-generation 1500M series cameras.
Interconnect Break-Out Board (TSI-IOBOB)
The TSI-IOBOB is designed to "break out" the 6-pin Mini Din connector found on our scientific camera auxiliary cables into five SMA connectors. The SMA connectors can then be connected using SMA cables to other devices to provide a trigger input to the camera or to monitor camera performance. The pin configurations are listed on the Pin Diagrams tab above.
Interconnect Break-Out Board / Shield for Arduino (TSI-IOBOB2)
The TSI-IOBOB2 offers the same breakout functionality of the camera signals as the TSI-IOBOB. Additionally, it functions as a shield for Arduino, by placing the TSI-IOBOB2 shield on a Arduino board supporting the Arduino Uno Rev. 3 form factor. While the camera inputs and outputs are 5 V TTL, the TSI-IOBOB2 features bi-directional logic level converters to enable compatibility with Arduino boards operating on either 5 V or 3.3 V logic. Sample programs for controlling the scientific camera are available for download from our software page, and are also described in the manual (found by clicking on the red Docs icon below). For more information on Arduino, or for information on purchasing an Arduino board, please see www.arduino.cc.
The image to the right shows a schematic of a configuration with the TSI-IOBOB2 with an Arduino board integrated into a camera imaging system. The camera is connected to the break-out board using a 8050-CAB1 cable that must be purchased separately. The pins on the shield can be used to deliver signals to simultaneously control other peripheral devices, such as light sources, shutters, or motion control devices. Once the control program is written to the Arduino board, the USB connection to the host PC can be removed, allowing for a stand-alone system control platform; alternately, the USB connection can be left in place to allow for two-way communication between the Arduino and the PC. The compact size of 2.70" x 2.10" (68.6 mm x 53.3 mm) also aids in keeping systems based on the TSI-IOBOB2 compact.
USB 3.0 Camera Accessories (USB3-MBA-118 and USB3-PCIE)
We also offer a USB 3.0 A to Micro B cable for connecting our cameras to a PC. Please note that one USB3-MBA-118 cable is included with each USB 3.0 camera except the CC215MU cooled Quantalux camera. The CC215MU camera ships with an appropriate USB 3.0 cable and should not be used with the USB3-MBA-118. The USB3-MBA-118 cable measures 118" long and features screws on either side of the Micro B connector that mate with tapped holes on the camera for securing the USB cable to the camera housing. When operating USB 3.0 cameras it is strongly recommended that the Thorlabs-supplied USB 3.0 cable be used, with the retention screws securely fastened. Due to the high data rates involved, users may experience problems when using generic USB 3.0 cables.
Cameras with USB 3.0 connectivity may be connected directly to the USB 3.0 port on a laptop or desktop computer. USB 3.0 cameras are not compatible with USB 2.0 ports. Host-side USB 3.0 ports are often blue in color, although they may also be black in color, and typically marked "SS" for SuperSpeed. A USB 3.0 PCIe card is sold separately for computers without an integrated Intel USB 3.0 controller. Note that the use of a USB hub may impact performance. A dedicated connection to the PC is preferred.

 Zoom
Zoom
The SM1A10A is a replacement SM1 to C-Mount adapter for the non-cooled Kiralux® and Quantalux® cameras. This adapter has external SM1 (1.035"-40) threads and internal C-Mount (1.00"-32) threads for compatibility with many microscopes, machine vision camera lenses, and C-Mount extension tubes. The adapter also comes with a SM1NT locking ring.